How to Turn a Flat Image into a Layered PSD
Turn a flat JPG or PNG into a layered PSD, inspect the exported layers, and understand what AI separation can and cannot recover.
 Image2Layer Team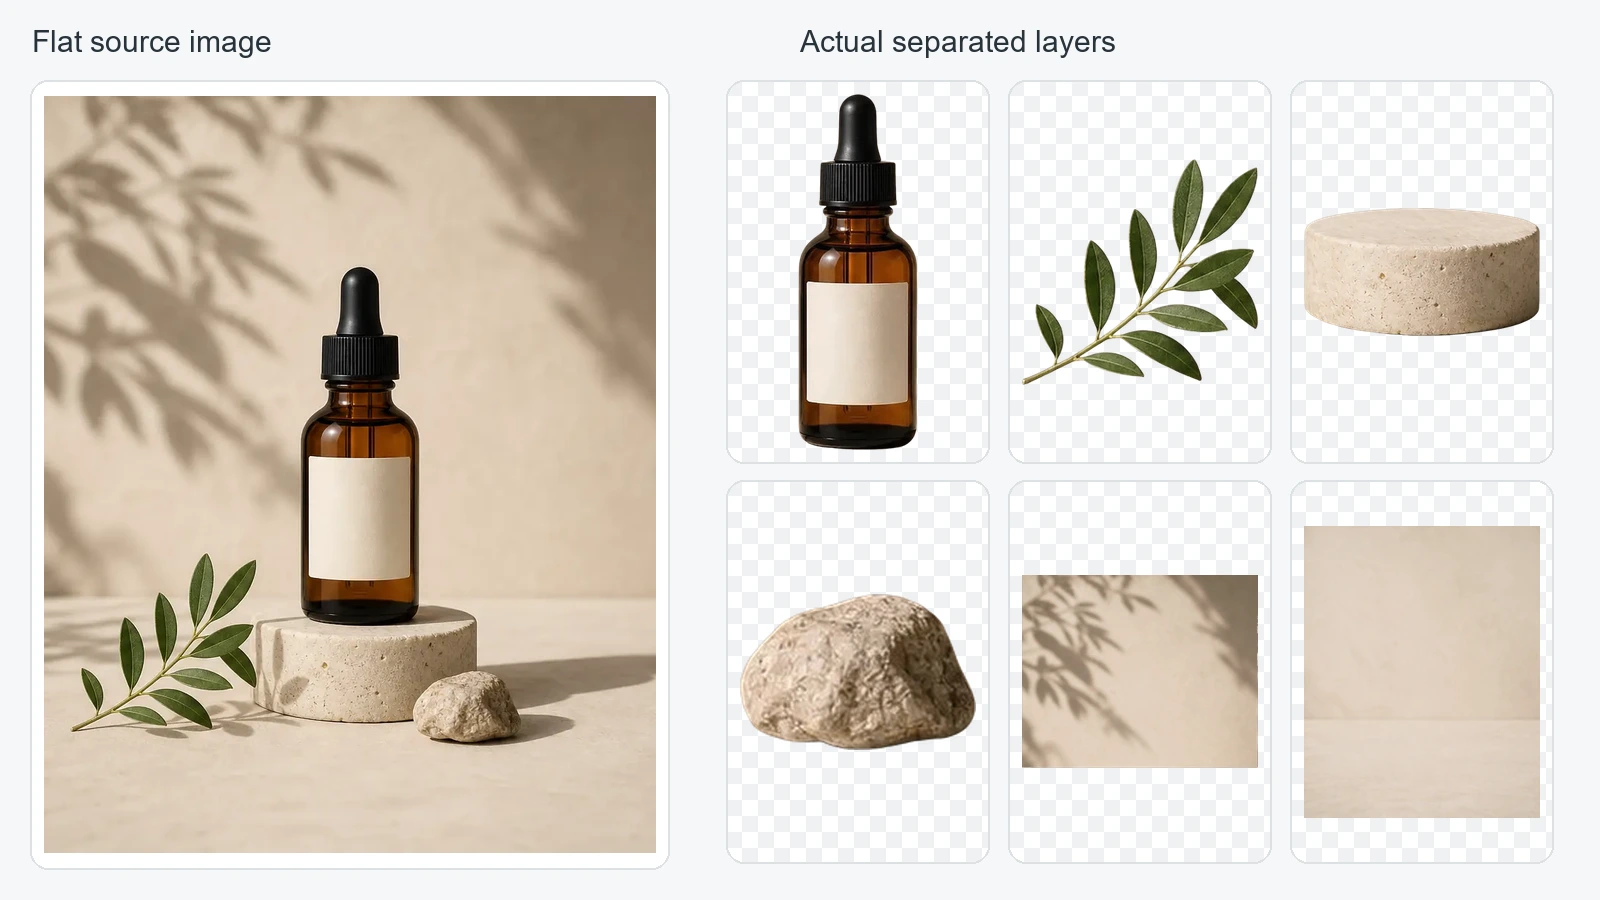
A flat image becomes a useful layered PSD when its parts are separated into independent pixel layers before export. Saving a JPG or PNG as a PSD does not, by itself, separate the bottle, leaves, lettering, or background inside that picture.
The practical workflow is: upload the image, separate the objects you need, review the actual result, and export a PSD. Then open the file and check that you can hide or move one object without moving everything else. You can start with Image to PSD.
The example above uses an existing product image and actual returned layers. The bottle, branch, pedestal, rock, and background previews come from the same decomposition run. They are not independently generated illustrations of an imagined result.
Does Saving an Image as PSD Create Layers?
A PSD can contain a single image layer or a much more complex document. Saving a flattened photograph as a PSD preserves a Photoshop document, but it does not know where one photographed object ends and another begins. A one-layer PSD is a valid file; it simply does not provide separate objects to edit.
Adobe describes PSD as a format that supports Photoshop document features. That describes what the format can store, not a promise that a conversion will reconstruct those features from a flat image. See Adobe's file format overview.
| What you do | What you receive | What you can edit independently |
|---|---|---|
| Save a flat image as PSD | A PSD containing the flat picture | The picture as a whole |
| Manually select and separate objects | Layers you create and refine | The regions you separated |
| Run AI separation, then export | Generated raster layers in a PSD | The objects successfully separated |
Choose the method according to the edit you need. If you only need to place a photograph in a Photoshop project, a single image layer may be enough. If you need to move its bottle without moving the leaves and tabletop, you need actual separation.
What Makes a PSD Genuinely Layered?
Useful layers contain their own pixels and transparency. They also have positions on a shared canvas and a stacking order. An appealing exploded diagram is not proof: the downloaded file must contain the corresponding layers.
For this example, the bottle and its label stay together. The branch, pedestal, and rock can be separate assets. Some background content is grouped. That is a more practical starting point than forcing every small highlight or leaf into its own layer.
Names make the result easier to inspect, but names alone are not enough. A layer called “Bottle” should contain the bottle, not a duplicate of the entire source image.
How to Convert a Flat Image into a Layered PSD
1. Choose a Clear Source Image
Start with the highest-quality source you have, before adding more compression or resizing. Clear outlines and distinct objects make the result easier to evaluate. Soft hair, transparent glass, reflections, and overlapping objects need closer review.
Use PNG to PSD or JPG to PSD if that matches your source. A transparent PNG can still be a single flattened asset: transparency does not mean that its internal objects are already separate layers. Keep the original file so you can compare recognizable details afterward.
2. Separate the Parts You Need
Upload the image and choose a sensible layer count. Auto is a useful starting point when you do not know how the scene should be divided. If you add separation notes, describe the intended edit: “Keep the bottle and label together; separate the branch and pedestal.”
Avoid requesting more layers simply because the maximum is available. Tiny fragments add cleanup work, and a higher count does not guarantee better boundaries. Our layer-count guide explains that decision in more detail.
For a label that must remain recognizable, keeping it attached to the product is often preferable to separating it. Inspect the returned label anyway: AI processing can change details even when the request is clear.
3. Inspect the Actual Layers
Check the result against the source before downloading. Look at the bottle outline, label, branch arrangement, and object edges. Ask whether the pieces support your next edit, rather than whether the preview looks impressive.
Review transparent edges against both light and dark backgrounds. A pale fringe may disappear on white and become obvious on a dark design. Also check for missing parts, duplicated objects, and foreground remnants in the background.
If a critical object is not usable, revise the notes or choose a simpler separation. A successful task status means processing finished; it does not certify the quality of every pixel.
4. Export and Open the PSD
Download the PSD when you want to continue in a layer-aware editor. Use individual transparent PNGs or a ZIP of the layers when your next tool needs separate assets instead.
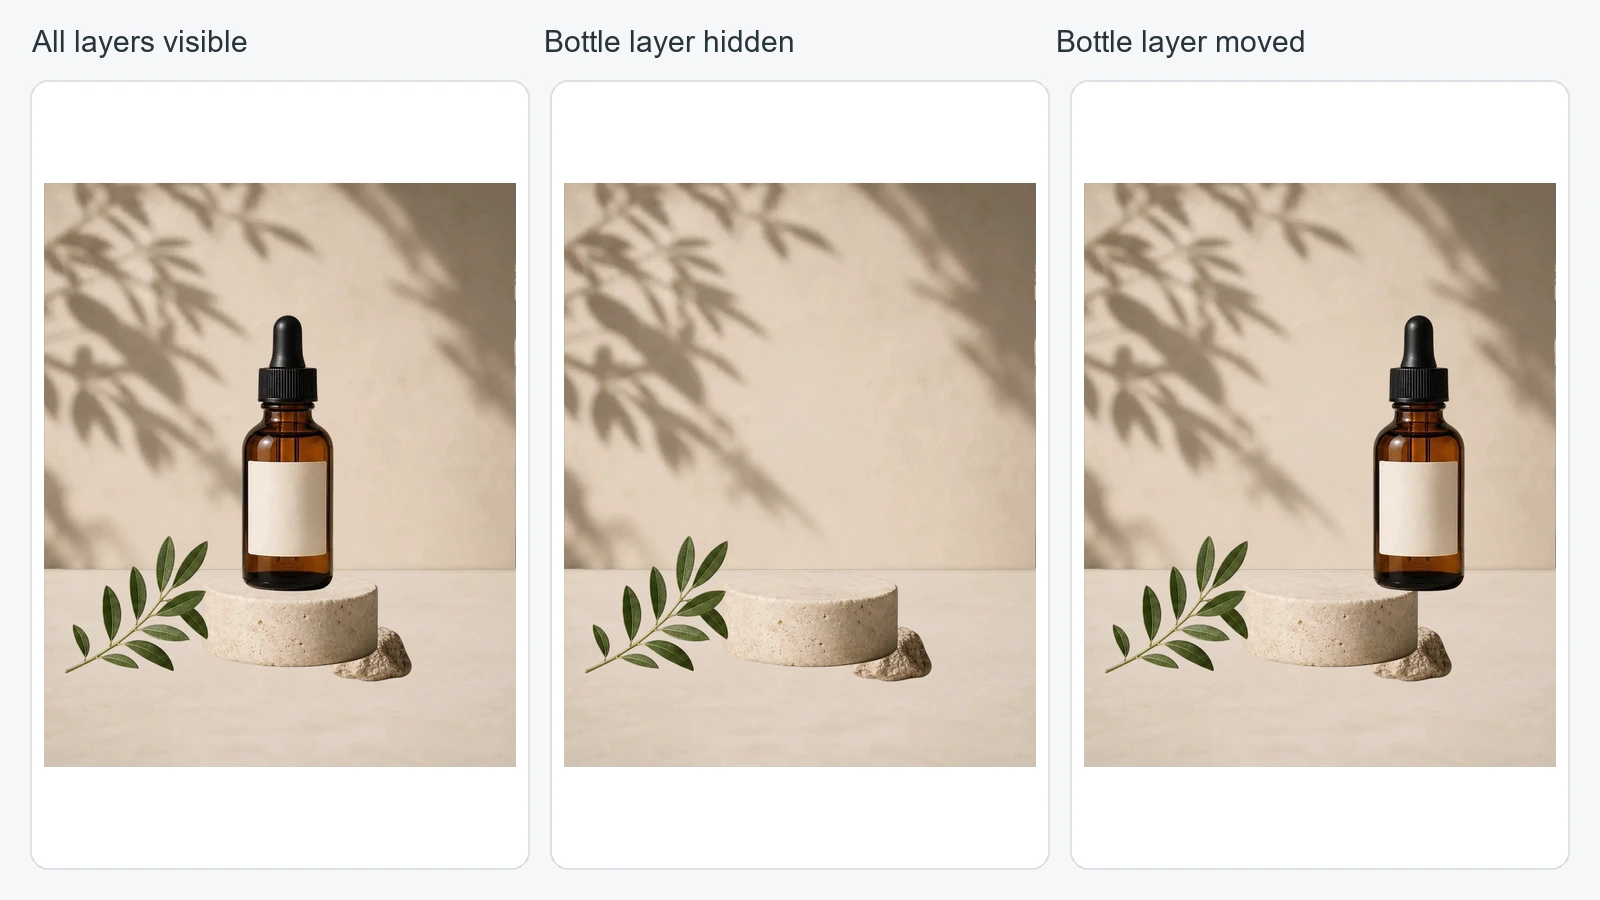
Open the actual PSD and inspect its layers. The image below was made by decoding a six-layer exported PSD. It shows those same pixels with all layers visible, the bottle hidden, and the bottle shifted. It is a rendered file inspection, not a Photoshop interface screenshot.
How to Check the Exported PSD
First, toggle the bottle layer off. The bottle should disappear while the other layers remain. In Photoshop, the eye icon controls visibility; Adobe documents this in its Layers panel guide.
Next, move the bottle a short distance. Its pixels should move independently. Inspect the newly exposed area and the bottle's original location. You may find generated background details, a remaining shadow, or edges that need cleanup. Those are useful findings, not something to hide in a demonstration.
Finally, compare the composite with your source. Check dimensions, important colors, recognizable product details, and the layer order. Save a working copy before destructive edits. Do not use a single flat preview as your only verification of the downloaded file.
What AI Layer Separation Cannot Recover
AI separation works from the visible image. It does not have access to the original designer's hidden layers, fonts, paths, masks, or adjustment settings. A text-shaped raster layer is not automatically editable text, and a separated logo is not automatically a vector.
Areas covered by an object must be estimated if the background is to continue behind it. That estimate can be useful for editing, but it is not recovered evidence of what was there. Fine textures, repeated patterns, shadows, and overlapping objects can reveal inconsistencies.
Output dimensions and fidelity also need checking. An input may be larger than the returned layer canvas. Inspect your actual export before deciding it is suitable for a large print or detailed commercial use.
Frequently Asked Questions
Can a JPG Become a Layered PSD?
Yes, after its content is separated into layers. JPEG compression and a low-resolution source can limit the detail available. Simply saving the JPG as PSD leaves its objects flattened together.
Can I Edit the Words Inside the Exported Image?
You can edit pixels in a raster text region. Changing the wording as editable type usually requires recreating it with a text tool and an appropriate font. Do not assume the source typography has been recovered.
Do I Need Photoshop to Use the Result?
You need an editor that supports the parts of the PSD you intend to use. Check the file in your chosen editor. Individual PNG layers are an alternative when you want to place assets elsewhere without importing a PSD.
Is This the Same as Removing the Background?
No. A transparent subject is one useful output, while multi-layer separation can provide several independently editable objects. Read image layer separation vs. background removal if you are deciding which workflow fits your task.
Ready to work with your own image? Create a layered PSD, then verify the downloaded layers before building your next design around them.
用自己的图片试试 Image2Layer
上传 JPG、PNG 或 WebP 图片,导出可编辑图层、透明 PNG 素材或分层 PSD。
打开 Image2Layer