How to Export PSD Layers as Transparent PNGs
Export every PSD layer as a transparent PNG in Photoshop, Photopea, GIMP or a free browser tool. Pick canvas size or trimmed, and avoid halo and naming issues.
 Image2Layer Team
Sometimes one flat picture isn’t enough. A developer needs the logo, the product and the headline as separate images. A motion designer wants every element of a poster to animate on its own. A game artist needs a sprite sheet’s pieces. In each case the job is the same: turn every layer of a PSD into its own PNG, with a transparent background, without breaking how the pieces fit together.
If you only need the whole design as a single image, the PSD to PNG converter does that in one step. This guide is about getting every layer out cleanly, and about the settings that decide whether those PNGs are useful later.
Quick Answer
- Photoshop, all layers: File → Export → Layers to Files, choose PNG-24, keep Transparency on, and tick Trim Layers only if you want tight crops.
- Photoshop, a few layers: select them, right-click, choose Quick Export as PNG. Each becomes a trimmed PNG named after its layer.
- No Photoshop: open the free PSD to PNG converter, choose every layer and download one ZIP. It runs in your browser, handles PSD and PSB files and up to 50 files at once, and needs no sign-in.
- Photopea or GIMP: possible one layer at a time. Fine for a handful of layers, slow for fifty.
Before You Export: Four Decisions
1. Canvas Size or Trimmed?
This choice decides how the PNGs can be reused, so make it before anything else.
- Canvas size: every PNG has the same dimensions as the document, with the layer in its original position and transparency everywhere else. Stack the files in any editor, video tool or slide and they line up exactly.
- Trimmed: each PNG is cropped to the layer’s visible pixels. The files are smaller and easy to drop into a web page or app, but the position is gone, so you’d need the coordinates to rebuild the layout.
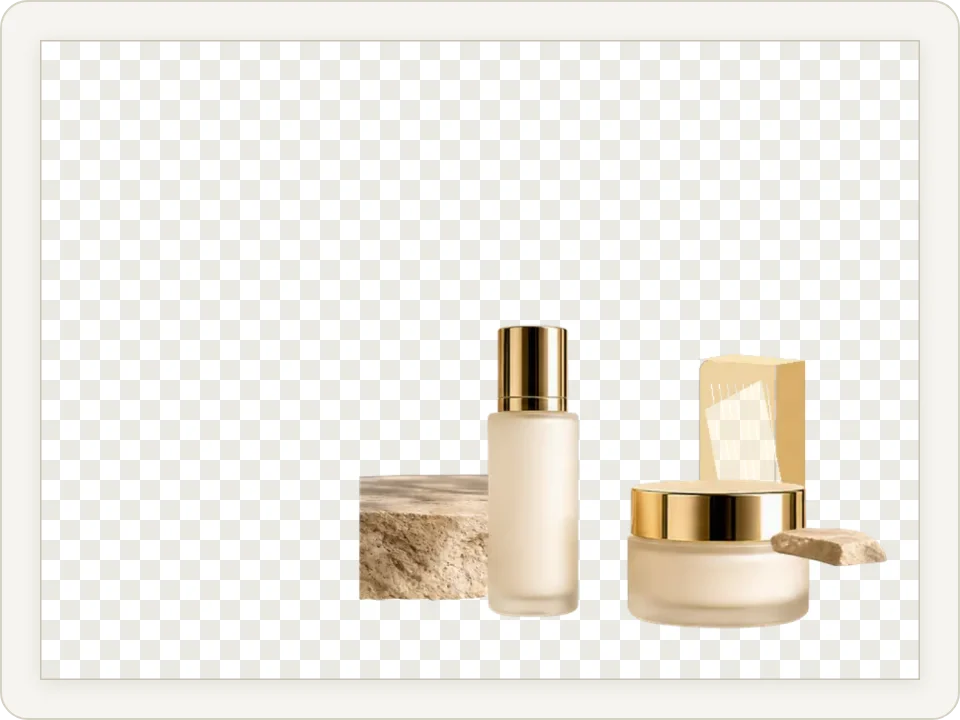
Canvas size: 1200 × 900 px, the product stays where it was in the design.
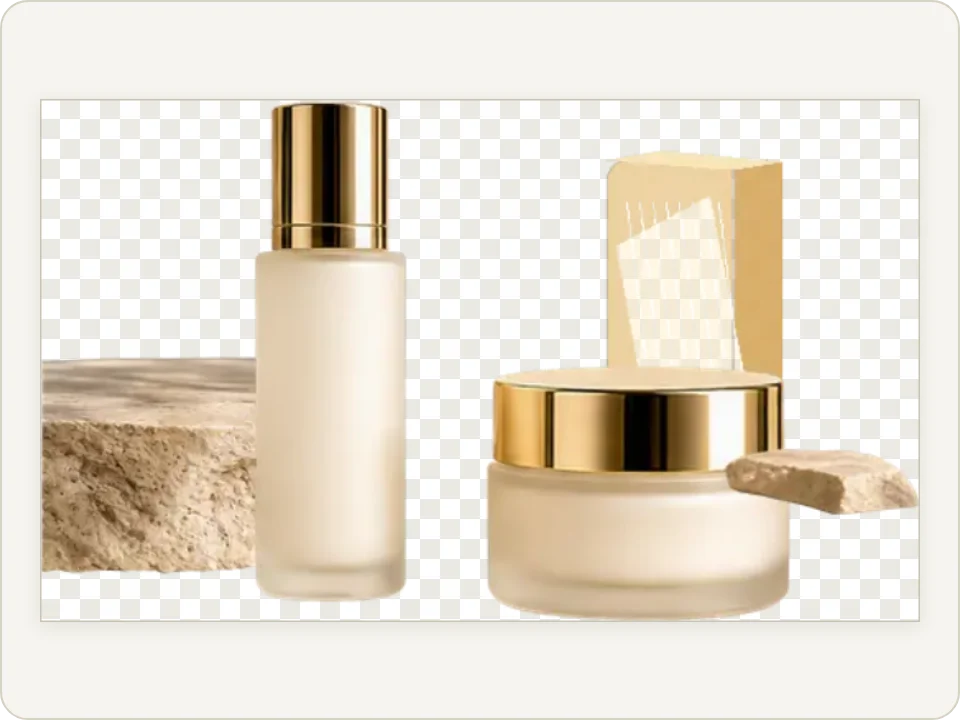
Trimmed: 722 × 429 px, cropped to the layer’s own pixels.
The same layer from a 1200 × 900 sample PSD, exported both ways with the PSD to PNG converter. The checkerboard marks transparent pixels.
| Use canvas size for | Use trimmed for |
|---|---|
| Animation and video (After Effects, Premiere, CapCut) | Icons, logos and UI assets for a website or app |
| Slides and social carousels built from one layout | Stickers, emoji and product cut-outs |
| Rebuilding the design in another editor | Game sprites and texture atlases |
| Handing a layout to someone without Photoshop | Reusing one element in a new design |
Trimming crops to every pixel that isn’t fully transparent. A soft drop shadow or a faint glow counts, so a trimmed PNG can be larger than the object you see.
2. Which Layers?
- Visible or hidden: hidden layers are often old versions or alternatives. Decide whether you want them before you export a folder full of leftovers.
- Single layers or whole groups: a button made of a shape, an icon and a label may be more useful as one merged image than as three files.
- Adjustment layers: they have no pixels of their own; they change the layers below them. Exported on its own, a layer doesn’t include the adjustment’s effect, and the adjustment layer itself produces nothing useful.
- Clipping masks: a clipped layer exported alone loses the shape it was clipped to. Export the base and the clipped layers together as a group, or merge them on a copy.
- Blend modes: a shadow set to Multiply or a glow set to Screen looks right only on top of the layers below it. As a separate PNG, it’s drawn in Normal mode and can look like a dark or bright blob.
3. Names and Folders
Layer names become file names, so “Layer 47 copy 3.png” is what you’ll get unless you rename first. A few minutes in the Layers panel saves an hour of guessing later.
- Name layers after what they are: “Logo”, “Headline”, “Product shadow”.
- Avoid characters that file systems reject, such as
/ \ : * ? " < > |. Good tools replace them automatically, but the results are less readable. - Watch for duplicates. Two layers called “Shape 1” can overwrite each other in some tools, or get a number added in others.
- If order matters, for example for an animation, use a tool that numbers the files or add
01,02yourself.
4. Size, DPI and Color
- Pixels are what count on screen. A 1200 × 900 PNG has the same pixels at 72 or 300 DPI; DPI only tells a printer how large to print it.
- Scale on export, not afterwards. If the design was made at 2× for high-density screens, a 50% export gives you the 1× set in one go. Scaling down once from the original is sharper than resizing exported files.
- Bit depth: 16- and 32-bit documents are usually exported as 8-bit PNGs, which is what browsers and most apps expect.
- Color: for the web, sRGB is the safe choice. A CMYK print file converted to PNG can look slightly different from Photoshop’s screen preview.
Method 1: Photoshop Export Layers to Files
The classic way to export every layer in one run:
- Hide the layers you don’t want, if any.
- Choose File → Export → Layers to Files.
- Pick a Destination folder and an optional File Name Prefix.
- Tick Visible Layers Only if you hid layers in step 1.
- Set File Type to PNG-24. PNG-8 limits each file to 256 colors and gives rougher transparent edges.
- Keep Transparency on. Tick Trim Layers for cropped files; leave it off for canvas-size files.
- Click Run and wait. Large documents can take several minutes.
All files land in one folder. Photoshop adds the prefix and a sequence number to each layer name, and it doesn’t recreate your groups as folders.
Method 2: Photoshop Quick Export and Export As
For a few selected layers, the export commands in the Layers panel are faster:
- Quick Export as PNG: select one or more layers (Ctrl-click on Windows, Cmd-click on a Mac), right-click and choose Quick Export as PNG. Each layer is saved as its own trimmed PNG, named after the layer. Set the default format and destination in File → Export → Export Preferences.
- Export As: right-click and choose Export As when you need control. You can set the format, transparency, a scale such as 50% or 200%, an exact canvas size, and whether to convert to sRGB.
Select a group instead of its layers and Photoshop exports the whole group as one merged PNG. That is the quickest fix for the clipping-mask and blend-mode problems above.
Method 3: Free in Your Browser With Image2Layer PSD to PNG
If you don’t have Photoshop, or you have a folder of PSDs to process, the free PSD to PNG converter does the batch work in your browser. There’s no sign-in and no credits, and files are processed on your device instead of being uploaded.
- Add your files. Drop up to 50 PSD or PSB files at once, each up to 500 MB.
- Choose what to save: the whole image, every layer, or both.
- Choose canvas size or trimmed for the layer files. Hidden layers are left out unless you tick the option to include them.
- Pick a size: 100% keeps every pixel; 50% or 25% gives lighter files for previews and mockups. You can also cap the longest side.
- Download the PNGs, or everything as one ZIP.
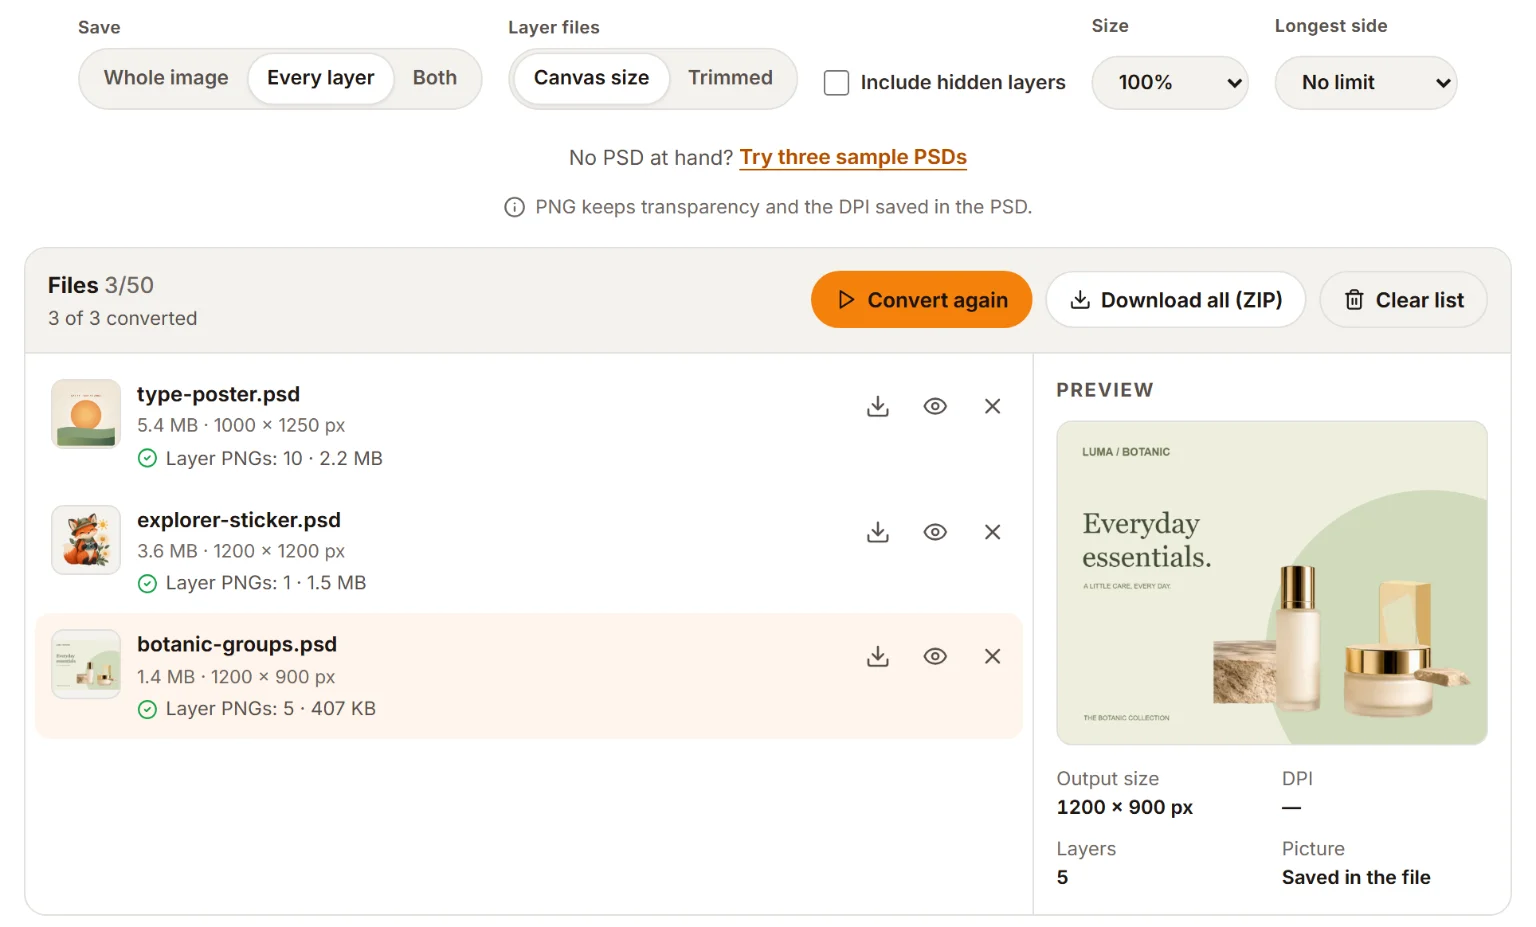
Three sample PSDs converted with every layer selected. Each row shows how many layer PNGs the file produced; download them file by file or all at once as a ZIP.
Inside the ZIP, each layer is a transparent PNG named after its layer and numbered from the top of the layer stack, so the order survives. Layers sit in folders named after their groups, and characters that file systems reject are replaced. The resolution stored in the PSD is written into each PNG.
Want to look inside the file first? Open it in the free PSD Viewer to check the layer names, switch layers on and off and see which fonts it uses. It can also save the selected layer as a PNG, or all visible layers as a ZIP. And if the whole image comes out blank in other apps, the converter rebuilds it from the layers. The guide to opening PSD files without Photoshop explains why that happens.
Method 4: Photopea
Photopea opens PSD files with their layers in the browser. It can export the selected layer on its own as a PNG, and File → Export as → PNG saves the visible image. To get every layer, repeat that for each one, or hide all layers but one before exporting. It works well for a handful of layers; for dozens, a batch tool is faster.
Method 5: GIMP
GIMP opens PSDs with layers and groups. Its File → Export As command saves the visible image, so:
- One layer at canvas size: Shift-click the layer’s eye icon to show only that layer, then choose File → Export As and give the file a
.pngname. - One layer trimmed: select the layer, choose Edit → Copy, then Edit → Paste as → New Image, then Image → Crop to Content, and export.
Community plug-ins can batch-export layers; check that one supports your GIMP version before relying on it.
The Methods Compared
| Method | Cost | All layers at once | Canvas or trimmed | Group folders | Several PSDs |
|---|---|---|---|---|---|
| Photoshop: Layers to Files | Subscription | Yes | Both | No | One at a time |
| Photoshop: Quick Export | Subscription | Selected layers | Trimmed | No | One at a time |
| Image2Layer PSD to PNG | Free, no sign-in | Yes | Both | Yes | Up to 50 |
| Photopea | Free with ads | No, one by one | Depends on the export | No | One at a time |
| GIMP | Free | With a plug-in | Canvas; trim by hand | No | One at a time |
Transparency Pitfalls and How to Fix Them
The PNG Has a White Background
The design almost certainly has an opaque background layer, which is exported like any other. In Photoshop, the locked “Background” layer can’t hold transparency at all. Hide it, delete it on a copy, or leave it out of the export.
Edges Have a Light or Dark Halo
Soft edges of a cut-out often carry color from the background they were cut from. On a new background, that shows up as a thin light or dark fringe. Preview your PNGs on both a dark and a light background before handing them over. In Photoshop, Layer → Matting → Defringe or the Decontaminate Colors option in Select and Mask cleans it up.
Shadows Look Gray or Muddy
A soft shadow is semi-transparent by design, so it looks gray over a checkerboard; that’s normal. If it looks wrong over the final background, the shadow probably used Multiply in the PSD. Rebuild it in the destination app with the same blend mode, or export the shadow merged with its object.
Transparency Shows as Black or White
Some image viewers and messaging apps draw transparent pixels as black or white. Before deciding an export failed, open the PNG in a browser or an editor that shows a checkerboard.
You Picked JPG by Mistake
JPG can’t store transparency, so transparent areas are filled with a solid color. Use JPG only when a solid background is what you want; the PSD to JPG converter lets you choose that color. For review copies with every layer on its own page, PSD to PDF is the better format.
Related Guides and Tools
- How to open a PSD file without Photoshop covers free viewers and editors on every platform.
- What is a PSD file? explains layers, masks and when to use PSD instead of PNG.
- Starting from a flat image with no layers at all? Image to Layers and the AI mode of PNG to PSD split it into separate layers; unlike the free PSD tools, AI separation uses credits. Read how to turn a flat image into a layered PSD first.
- See every free and AI tool in all tools.
FAQ About Exporting PSD Layers as PNG
How do I export all layers of a PSD as separate PNG files?
In Photoshop, choose File > Export > Layers to Files, pick PNG-24 with Transparency on, and click Run. Without Photoshop, open Image2Layer’s free PSD to PNG converter, choose every layer, and download one ZIP with a transparent PNG per layer.
Can I export PSD layers as PNG without Photoshop?
Yes. Image2Layer’s PSD to PNG converter exports every layer of a PSD or PSB file in your browser, free and without uploading the file. Photopea and GIMP can also do it, one layer at a time.
Why is my exported PNG not transparent?
Usually the design has an opaque background layer, often a white Background layer, which is exported with the rest. Hide it or leave it out before exporting. Also check that you chose PNG rather than JPG, because JPG cannot store transparency.
Should I export layers at canvas size or trimmed?
Use canvas size when the layers have to line up again, for example in a video editor, an animation or a slideshow. Use trimmed when each layer is a standalone asset, such as an icon, a sticker, a sprite or a product cut-out.
Why do my exported layers look different from the PSD?
A layer on its own loses whatever other layers did to it. Blend modes such as Multiply or Screen, adjustment layers above it and the base layer of a clipping mask all affect how it looks inside the PSD. Export a merged group, or merge those layers on a copy, when you need the combined look.
Does exporting PSD layers to PNG reduce quality?
No pixels are lost, because PNG is lossless. Two things can change: files with 16 or 32 bits per channel are usually saved as 8-bit PNGs, and colors can shift slightly if the file uses a wide-gamut or CMYK color profile instead of sRGB.
How do I export a layer group as one PNG?
In Photoshop, select the group itself in the Layers panel and use Quick Export as PNG or Export As; the group is saved as one merged image. Another way is to hide everything outside the group and export the whole image.
What DPI should exported PNG layers have?
For screens, DPI does not matter: only the pixel dimensions do. DPI is a note used to size an image for print. If you print the layers, keep the document’s resolution; tools that write it into the PNG, such as Image2Layer’s converter, save you from re-entering it.
Try Image2Layer with your own image
Upload a JPG, PNG, or WebP image and export editable layers, transparent PNG assets, or a layered PSD.
Open Image2Layer